Showing posts with label Art and Craft. Show all posts

19 April 2013

Butterfly Garden Project

I came across this cute kids project that included cupcake paper moulds as flowers.  It looked easy enough to make I just didn't anticipate what a major project it would become and how Trini and I took it from simple to super embellished.

Our cupcake mould inspiration.
Our final product.

Supplies:

A2 heavyweight paper
2 x 5 different coloured patty pan moulds (you can use patterned ones as well that complement one other)
2 yellow patty pan moulds for the sun
6 large coloured buttons big enough to fit on the base of the mould
6 small coloured and shaped buttons
5 coloured popsicle sticks
3 coloured felt butterflies or use butterfly stickers
cut 10 leaves out of patterned or plain green paper
Crayola water based glue
glue stick
ladybug stickers
felt flower stickers for the border or just use normal flower stickers (optional)

Instructions:

1.  On the heavyweight paper arrange the pieces until you are happy with the flower garden layout.

2.  Glue the popsicle sticks down first as it gives you the floral spacing and foundation to work upwards on the page.

The pink popsicle stick is being prepared.

3. Grab two patty pan moulds of differing colours.  Turn one of them inside out.  Apply glue to the interior of the mould that is the right way then add the mould turned inside out together and let it dry.  Repeat process with the rest of them.  Make sure that the sun is a combination of two yellow moulds.

Applying glue to inside of patty pan mould.

4.  Apply glue to the large button and place inside of mould in the centre.  Then apply glue to small button and add to the top of the large button.  Repeat process with all the buttons.  For the sun use two yellow buttons.  Set aside to dry.

Applying glue to the big button.

Adding the buttons to the gluey mould.

5.  When the moulds are dry, apply glue to the bottom of each mould and place at the top of the popsicle sticks.  Adhere the sun mould in the top right of the heavyweight paper.

Applying glue on the bottom before adhering to paper.

6.  Apply stick glue to each leaf and position in place, one on each side of the popsicle stick.

Applying glue to leaves.

7. Now is time to embellish with felt stickers or normal stickers.  Add the butterflies above the flowers and the ladybugs in and around the garden.

Some of the felt stickers were a little tricky to handle.

8. Optional - Embellish the frame with more felt stickers or use normal stickers.

Adding the finishing touches to the frame.
Trini and our joint project.

This project is fiddly and time consuming.  However, I found that the gorgeous colours, buttons, butterflies, ladybugs and paper moulds were just the right ingredients for Trini to remain focused throughout the lengthy process of producing her Butterfly Garden.

Now that you know how to do it, give it a whirl.  Make it as simple or complex as you wish.  Share with us your project and tell us what you got out of it, besides a pretty indoor garden.

07 April 2013

Hand Leaves Tree Project

Here's a really cool project I found on the internet when I was searching for kids paper crafts.  I recently purchased a bunch of craft bits and pieces from a friend for Trinity, which included a collection of 15 x 15 cm patterned paper squares. 

The pretty patterned squares.
They were the perfect size for cutting out shapes of Trini's hands with little wastage.  Actually don't throw out the paper off-cuts as you can use them on another project that we will be working on soon and I'll post the instructions at some point.

Supplies:

Patterned or coloured paper (enough to cut out 12 hands, ie A4 size then have 6 sheets) 
A2 heavyweight paper
Crayola brown, light blue and white pots of paint (I use Crayola because they are non-toxic and safe for Trini)
A4 size cardboard to create hand template (cereal box would be perfect)
1 x wide paintbrush for the large surfaces
1 x narrow paintbrush to tidy up edges
Paint tray or disposable plate
Pencil and eraser
Glue stick
Scissors
Green sticky felt border (optional - it just provides detail)
Brown fine point permanent marker (optional - it just provides detail)

Instructions:

1. On the cardboard trace your child/children's hands and cut out.  Store the hands either for other hand projects or stay tuned for a project we'll do embellishing the hands and turning them into their own craft.

Cardboard hand templates.

2. Use the cardboard templates to trace 6 left and 6 right hands onto your coloured or patterned paper, then cut them out.

3. On the A2 paper place the hands like leaves approximately in a semi-circle shape then when satisfied lightly draw a tree trunk with branches meeting with the hands.  (If you have a good look at the image below you'll notice that my branches were far too big and the hands didn't fit all that well.  That's because I drew the tree first and then tried to fit the hands on the page.  Since it didn't work, I did it the reverse way by placing the hands first and then drawing the tree and branches.  Much better.)

Arranging the hands until I was happy with the look.
Take a photo of the placement so you can refer back to it.

3. Remove the hands from the sheet and with a pencil connect the lines so that the tree branches are defined.  I know this may seem a little fiddly, however, I prepared this part in the evening so that it was ready for Trinity the next morning to just get into it.

Pencil outline and ready to be painted.

4.  On a paint tray or disposable plate pour a little brown and instruct your child to paint the tree with the wide paintbrush.  Use the narrow paintbrush to fill in gaps and straighten out edges (you may want to do that if your child is too young for this detail).

5.  Clean the brushes when done and then paint with blue.  I added some white to the blue to lighten it a bit but you don't need to if you're happy with the colour.  Trinity enjoyed the process of mixing the two colours with the opposite end of a paintbrush.

The foundation is complete and ready for the
hand leaves to be glued.
6.  Use the photo to guide you where to place the hands onto the tree.  Take one hand at a time and with a glue stick instruct the child to run the stick across the whole hand then put the hand back in place and smooth with your hands.  Add more glue to parts that are not sticking down.

7.  With the brown marker draw some adhoc lines on the tree trunk to give it more detail.  Otherwise it looks a little bland when compared to the hand details.  Daddy has a very steady hand so we roped him into drawing the lines for us.

Thank you Daddy for spunkying up our tree trunk.
The Hand Leaves Tree is finished.
8.  You can stop at this point, put your initials and date on it and hang it up somewhere with blu-tac to enjoy.  However, we took it a step further.  We happened to have green felt border that can be stuck directly to the project once the paper was peeled off the bottom.  Not fun and certainly not for children to try.  It is very fiddly but we knew it would look pretty.  So if you have access to some cut it to size and stick it on.  Alternative items that you can use are ribbons, scrap fabric, buttons or green paper.  Any one of these items will add texture and interest at the bottom of the page.

Why me?? How did my girls rope me into this??
Felt border added for some extra texture.
We added our initials inside the flower on the bottom right.
This project can be simplified for little ones by cutting out 4-6 hands on colour paper, draw and cutout a tree trunk from colour paper and then getting your child to glue the ensemble onto a background sheet.

This simple exercise develops their dexterity, focus and concepts of how bits put together can create a picture.  Their sense of accomplishment will be visible on their faces and you can encourage them to show their picture to a friend or family member (in our house it's usually Daddy) and talk in simple words about how they did it (talking about it reinforces the learning experience for another time).  The key is to keep the whole exercise simple filled with encouragement.

02 April 2013

Red Seashell Heart - Project with my daughter

The idea of the love heart was borne out of a day my pockets were full of seashells I collected whilst waiting for my daughter to finish her art class.  When I showed her the seashells she oohed and ahhed just like any other 4 years old little girl.

Once at home we cleaned and dried the shells and then admired the pretty colours, different shapes and unique markings on each one of them.  The ones Trini liked the most she put away in a bucket as a private collection whilst the rest was to be used for our project.

Grabbing a 25cm x 25cm square canvas, I showed Trini how it might look if we placed the shells in the shape of a heart.  She loved the idea and from there we just experimented and built on it one step at a time, given that we didn't actually know how to pull it all together.

Not a project I would usually recommend for a 4 years old who lives in the now, with short-term concentration and limited focus but this project was far too tempting and Trini wasn't left on her own.

The one thing that I discovered with her is that by working on the project in stages over a period of days, she didn't seem impatient or unfocused.  She seemed to genuinely enjoy the process of painting one day, gluing another day, painting again, and so on.  It took us about a week to complete but we were both pleasantly surprised with the outcome, so much so that we have already worked out the next project with seashells: a rainbow with white clouds and yellow sun.  Quite ambitious as it'll require more colours to paint with, more organising and work on a larger canvas in order to fit a rainbow on it properly.

Anyway here is our experiment, one step at a time:

Supplies:

Seashells of mixed sizes and shapes (lots and lots of them)
25 x 25 cm square canvas 
White acrylic paint (optional - see instructions below)
Red acrylic paint
2 paintbrushes
Toothpicks
Crayola Washable School Glue (it's easy to clean off little hands)
Pink glitter paint (optional)

Instructions:

If you don't live near the beach then make sure you have a substantial collection of seashells.  Rinse them to dispose of any leftover sand and leave them to dry.

Lay out some newspaper and paint the canvas with white acrylic and set aside to dry.  I know it's already white, so you don't have to if you see no sense in it.  I just preferred to do that. 

Grab the seashells and with the red acrylic, paint each one of them.  Place them on the  newspaper and let them dry.  It's a messy process as you can see from Trini's hands below but a fun one for any child. 


Painting small seashells develops a child's dexterity, attention to detail, patience and gentle painting rather than enveloping the shells with gobs of paint.

Our shells in drying process.

Guide your child in placing the shells on the canvas in a heart shape and organise them until satisfied with the outline.  Once done, grab the glue and squeeze some on a disposable plate.  Take a toothpick, roll one end in the glue, grab a shell used to outline the heart and gently dab the glue on the edge of the unpainted end, then put it back down on the canvas where you got the shell from.  Continue this step all the way around the outline.

Trini adding the glue on the unpainted side
with toothpick dabbed in glue.

The glued shells on the canvas nearing completion.

This next stage is a bit easier.  Have your child hold the glue bottle and squeeze it inside the heart outline making sure the glue covers the whole area.  Guide your child's hand if needed and ensure that the glue is reasonably even rather than gobs in places and thin in other.

Glue adhered to the inside of the heart outline.

This part is quite fun for the child as he/she applies the shells to the glue.  The key here is to have the shells touching each other and filling in the gaps.  Kind of like completing a jigsaw puzzle.  Adjust discreetly as needed whilst allowing your child as much freedom as possible to complete this part of the project.  Once done set aside for a day to dry. 

Jigsaw time.  Filling in the gaps.

We ran out of shells so we spent a wonderful afternoon on the beach collecting more.  This time Trini was participating which made it more fun for her as she felt that she contributed to the collection process.  We are fortunate to be living in a condo across from the beach making it easy for us to collect whenever we need to.

Collecting more shells.

With a topped up collection and more painting, we placed another layer of shells squeezing a lot more glue.  This gets a bit tricky for a child as it needs an eye for detail, so help by directing where the shells should be placed on the heart.

When completed have the adult generously squeeze glue between the shells as shown below to ensure that the top shells will adhere to the bottom layer.  Set aside for a couple of days for the glue to dry and cure. 

Generous amount of glue are added to ensure the
shells adhere to one another.

Crayola glue usually dries clear when applied in small quantities.  Due to the generous application for this project the glue dries cloudy so it is necessary to paint the glue and apply another coat on the shells.  Have your child paint the interior shells whilst you paint the outline shells to ensure no red paint ends up on the canvas.

Applying red paint to the glue and another coat on the shells.

At this point you can stop, let the paint dry and put it on display.  We went a step further as we had glitter paint in the cupboard in pink, red and gold.  We applied each colour to sample shells to see which effect we liked the best.  According to Trini, the pink was the best option so that was our chosen colour.  We applied the pink glitter glue with Trini painting the interior and me painting the outline.

Glitter glue being applied.

Once applied let it dry for a couple of hours and then apply a second coat.

I'd like to have used a glossy varnish but we didn't have any so for now it's on display as is.  Maybe the next time we go to an art shop we'll get the varnish and give the artwork a couple of coats.

The pink glitter paint has softened the brightness of the red.

This project may seem complicated but when broken down into stages it makes for an easy and fun project that is worth the effort.  Besides the abovementioned skill developments, your child may also realise how an artwork can be created out of simple items such as shells, a little paint, glue, canvas and some patience.

30 January 2013

Abrakadoodle Art Classes for Children

Kids on Canvas Art Camp - October 2012

Founded in 2002 in the United States by two education and franchise experts, Abrakadoodle to date has been the winner of 7 Nickelodeon First Place Awards for “Best Art Class to Bring Out Your Child’s Inner Picasso”.

A comprehensive art education international franchise with locations in US, Singapore, Malaysia, Japan and China, Abrakadoodle’s art classes are for children from 20 months to 12 years. The programs are designed with the process of creating art rather than the outcome of the art, whilst the curriculum was developed by artists and educators with focus on developing right brain competencies. 

The same classes are never repeated, giving the child new and exciting projects to look forward to. My daughter relishes telling me each week that she doesn’t know what she will be doing in art class. It is like a weekly dose of surprises.

Only one hour long, once a week, the projects are designed to be completed in one sitting, keeping the excitement and momentum going, whilst providing the child with satisfaction of going home with a finished product. The last 15 minutes of class is dedicated to gallery time when each child talks about their art work before an audience who are generally the students’ parents.

Along with regular weekly classes, Abrakadoodle runs art camps usually during school holidays.  Trini has successfully and with much pleasure completed 3 art camps.  Each one had its own theme, run over 3 days for 3 hours per day.  At the end of each camp, Trini produced 6 pieces of art which are completely original.  By far my favorites are the work from her Kids on Canvas camps where she learned about painting on canvas using acrylics.  In Abrakadoodle's words: "Children use their imaginations in creating artwork based upon the techniques, style and vocabulary of master or contemporary artists from different parts of the world!" Too true.

Such artists include: Pierre Renoir, Piet Mondrian, Laurel Burch, Amedeo Modigliani, René Magritte, Andy Warhol, Mort Solberg, Jane Freilicher, Roy Lichtenstein, Natasha Westcoat, Johannes Vermeer and Yin Lum.  Each accomplished artist imparts an artistic style or technique such as: Renoir is synonymous with Impressionism, Magritte with Surrealism, Lichtenstein with Pop Art and Vermeer was a Provincial painter known for the Girl with a Pearl Earring painting.  Yin Lum is a contemporary abstract artist hailing from Singapore, whilst Mort Solberg is an American artist with an affinity for American Indian history and culture.

Trini has been part of Abrakadoodle for about seven months and I remember her first piece of work which was using sponging and layering techniques to produce Peek-a-Boo.


A few months later Trini experienced her first Kids on Canvas camp and below is my favorite being Trini's interpretation of Rene Magritte's well known Son of Man painting which consists of a faceless man with a bowler hat.


The following week Trini concluded Abrakadoodle's Beach Camp where their art work had a beach theme using various mediums such as paper, sand, clay and screenprinting.

The students' collective work. 
The Sea Shell designs are my favourite.
After a couple of months abroad, Trini kicked off the new year with another Kids on Canvas camp and resumed her regular weekly classes.  More fun ensued and here's her most recent works.

Inspired by Jane Freilicher

Inspired by Mort Solberg

Inspired by Roy Lichtenstein

I don't know how much theory Trini takes in but I know that she is having loads of fun.  I suspect over time, everything she learns and is exposed to will slowly start making sense.  I most certainly notice her work getting more creative, the art more defined (less blobs) to the viewer and her colour combinations (which often reflect pink and purple) are aesthetically pleasing.

My objective as her mum is to delight her with creative opportunities, give her art related outlets to express her imagination and essentially let her dream a beautiful world for as long as possible.  As Pablo Picasso once said:

Every child is an artist.
The problem is how to remain an artist once we grow up.


16 August 2012

Marshmallow Painting

Together with my daughter, we spend enormous amounts of time painting, painting and some more painting.  Not an artist myself, I ran out of ideas and looked for inspiration on You Tube where I came across marshmallow painting.

Not unlike potato painting, which Trini has done before, marshmallow painting comes with an added bonus.  Mummy buys a pack of marshmallow of which half is used for painting and the other half for eating.

Trini's got the painting and eating marshies down pat.

Using Crayola's Washable Kids Paint (comes in a pack of 10 pots) and a disposable plate, pour a dollop of the chosen colours and place a marshmallow on top of each colour.


On a sheet of paper, guide the child to pick up a paint loaded marshmallow and stamp away on paper.  Keep changing marshmallows till the paper has a kaleidoscopic effect.

Trini's solo marshie stamping.
Trini and mummy marshie artwork.
Let it dry and either hang it on an art wall or frame it in one of Ikea's child friendly frames (look for Nyttja which comes in several bright colours with durable plastic instead of glass, keeping the kiddies safe).

Trini loving the marshie stamping and even more
the marshie eating.
NB: make sure the child doesn't eat the painted marshmallow.  I gave Trini a small plate with 3 marshies on them so she can indulge as well as paint with them.

07 March 2012

Cross-Stitching in the Noughties

Whilst I spent the 90s stitching tapestries, somewhere in the noughties I morphed into cross-stiching. Not particularly clear about its beginnings, I suspect it might have had to do with my membership with Doubleday Book Club where I purchased Cross-Stitch Designs from China by Carol Phillipson as a result of my appreciation for oriental designs.

I chose a simple project from the book as a way to sample whether I will enjoy cross-stitching. The papercut design of a black dragon was simple enough and lots of fun to stitch. Instead of a single dragon, I chose to stitch two of them facing each other on red aida cloth (red being our favourite colour). The mirroring dragon encountered some counting issues, followed by some unpicking but I soldiered on and in a short timeframe the black dragons were completed.

During that time I did a short framing course, so I had the pleasure of framing my first cross-stitch myself and then gifting it to my husband for Christmas who loved it. John has always shown genuine interest in my craft making it a pleasure and easy to chat about.

Twin Chinese Dragons (2001)

From here, I upped the ante only slightly by tackling another project from the same book with 11 colours instead of one. The Mandarin Fish design, originally in different shades of blue on white Aida, came from a Ming Dynasty dish showing the fish among weeds. I chose to stitch this project for my dear friend, Bec, who loved green and loved fish. First step was to alter all the shades of blue to shades of green. Instead of Aida, I wanted to try out plastic canvas as I was attracted to the idea of not using a frame. Ughhh that was a big mistake. I didn't consider that I would have to stitch the background, an unnecessary step, had I just used cloth instead of plastic. Needless to say, I never used canvas again and the attraction instantly vanished.

In order to spice up the fish, I chose red as the background colour. For some, the colour is probably too strong but it sure helped me persevere and stitch over every single plastic hole. I am delighted to know that the cross-stitch continues to hang in my friend's home eight years later.

Mandarin Fish (2004)

My best friend was always fond of the Twin Chinese Dragons, so for the third time I opened the book to look for an alternative dragon design and came across two mirroring dragons with a circle in the centre.  The design was found on a jade 'Bi' disk from the Zhou period (1050-221BC).  The author describes the dragons as a "symbol of heaven and apparently the hole in the circle is supposed to allow lightning to flash through so that it acts as a form of protection from evil spirits for the dead".  It used one multi-coloured floss which was extremely fun and very easy to use with great effect. 

Zhou Dragons (2006)
Image credit: Cross-Stitch Designs from China

My nephew spent his early years as a Thomas the Tank fan and played with them for hours on end day after day.  At one point his kinder teacher expressed concern regarding his exclusive interest in trains only.  Given that he is now ten, into Lego, sports and friends it is obvious the concern was unfounded on this occasion.

As a train enthusiast myself, I came across Jeanette Crews' 55 Trains One Nighters Design.  This delightful collection of steam engine and diesel trains are great to use for making birthday cards but I took on a greater challenge by wanting to stitch all of them on one cloth.  With no positioning instructions, I spent a lot of time counting and recounting positions.  Whilst stitching each train was quick and uncomplicated, the backstitching was extremely time consuming.

It took me close to a year to complete and shortly before my daughter's birth I put in the final stitch.  Unfortunately by this time my nephew was eight and onto Lego with trains a thing of the past.  So I decided to make a bit of an heirloom out of it by inserting the three main family surnames (my husband's, my sister's and my own) along with my daughter's and nephew's first name.
 
55 Trains (2008)
A year later we travelled to Bali with my sister and her family to celebrate my daughter's first birthday.  We went to Fiji for my nephew's first, so we thought the timing might be fun and a story that the kids could be told as they grow up.  Whilst staying at the Club Bali Mirage Resort we met a Welsh couple whom we spent a lot of time with.  The bloke was a keen dragon collector and he enjoyed drawing what he saw as a way of remembering his holidays instead of photographing.

When I returned home, I decided to check out the Welsh flag and using PC Stitch convert it into a cross-stitch pattern with a vague thought that I might send it to him.  Again not a complicated pattern, consisting of only three colours (red, black and green), the project only took two months to finish.  My husband, also a dragon enthusiast, liked it so much that we kept it.  We posted a very nice Christmas card to the Welsh couple, unfortunately never heard back from them.

Historically, Henry VII used the flag with the Red Dragon along with the Tudor colours of green and white at the Battle of Bosworth (1485).  A defining moment in English history, through Henry's victory, the battle ended the War of the Roses and gave rise to Tudor reign. 

Of all the countries in the world Wales and Bhutan are the only ones to have a dragon on their flag.
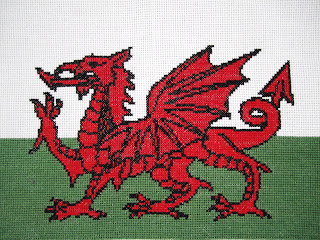
Flag of Wales: The Red Dragon (2009)

This next project is a Semco design and was inspired by my daughter's affinity for butterflies.  The colour combinations are vibrant and very appealing.  I especially enjoyed stitching the large butterflies.  Throughout the project I encountered a couple of snags.  The thread provided kept fraying.  An unusual experience and a little disheartening.  Perhaps why I keep to DMC floss.  It has not yet let me down and has an enormous collection of colours.

My second problem was with the border.  Using two threads instead of one, I ran out of floss with 60 stitches to go.  I needed to match the colour with DMC floss and whilst I got pretty close and you would really need to look to find the difference, I know it's different.  I put it down to a quirk in the design and just live with it.  For the second time, Ikea framing came to the rescue (55 Trains is the other one).  I find the white boxed frames (Ribba) with mounting boards included very nice, simple and reasonably priced.  It now hangs in my daughter's bedroom amongst all her other colourful (and often pink) items.

Butterflies (2010)

The same year I was further inspired to stitch my first Chrismas project.  I came across Christmas Cross Stitch by Claire Crompton which included 500+ motifs and designs.  From leftover threads and cloth, St Nicholas with his bag of toys came to life.  Stitching his red floor length coat and white fur trimming was just bliss (have I mentioned how much I love red).

Having moved abroad indefinitely very few of my needlework were shipped.  Most of them are sitting in storage back in Australia.  Not intending to have a Christmas tree in Singapore, I left all my tree decorations behind as well.  I only shipped decorations that could be placed on furniture and with that in mind St Nicholas was shipped as well.  He proudly came out Christmas 2011 and sheepishly I admit that in the end we did have a tree.  Why?  Because my sister with her 10 years old son and husband came to share Christmas with us and my now 3 years old girl, who actually understood the occasion (more from the perspective of lots and lots of pressies rather than the spiritual or religious aspect of it).  Did I wish I had my baubles with me now?  Yes, it would have saved me having to go out and buy some new ones.

St Nicholas (2010)

My aunty purchased the Semco designed Dragonfly Dinner cross-stitch kit during her visit from Italy in 2009.  She asked if I was willing to stitch it for her and as usual I obliged (and yes, I had fraying issues with this one too but managed to work around it).  It took me a year before I started it and did so simply because I wanted to get it out of my To Do basket.  Of course with other distractions such as selling our house, selling our home contents, packing and shipping or storing the rest of our goods, choosing to stitch a tapestry called Illumination for a christening meant that it took another year before I seriously committed to completing it and posting it in time for Christmas along with a small Christmas Robin which I snuck in (pattern was from the same book as St Nicholas).  Unfortunately, Italian postal services being as they are, very very slow and unreliable, the cross-stitch reached my aunty two months later.  At least she got it.

Dragonfly Dinner (2011)
Christmas Robin (2011)

And this brings me into 2012.  Numerous projects are awaiting my time.  My husband believes I need another couple of lifetimes to complete all that I have.  My laptop is brimming with digital patterns, my bookshelf has nicely stored lever arch folders with new patterns along with half a dozen cross-stitch books, my study drawer has several small ones of Disney princesses and birds for my aunt and finally my floor frame has an exceptionally painful tapestry that I am literally doing battle with.

The detail on the tapestry is so fine that I need to use the included chart to stitch.  It is very difficult to work with a chart on a printed canvas because the stitches don't match up with the canvas but I can't work without the chart because there isn't enough definition on the canvas.  Had I known this beforehand, I would have opted for the cross-stitch pattern and I wouldn't be distracted by the printing.  I may have even finished it by now but after two years I am only one-third complete.  This will take a while as I am already eyeing off alternative projects to restimulate my mind.

Here are some of the designs waiting for my time which I look forward to stitching one day.

Deck of Cards Queens by Maxine Gadd (www.mysticstitch.com).
One day they will hang in a rumpus room somewhere in this world.
Misaki & Sakura (www.maia.com)
Velvet & Steel by Maria William (www.shinysunscrossstitching.com).
This warrior with raw steel is for my hubby.


Couple in Love by Vervaco.
Notice the red theme continues.


My Fair Lady (www.maia.com)
Allegory of Wealth (www.kustomkrafts.net)
You might note that the complexity level has just skyrocketed.  Perhaps why I keep looking at them and not stitching them.  The day will come....

Here are some terrific websites that I have done business with and have been very happy with their service and their products:

www.foxcollection.com.au
www.needlepointus.com
www.ozstitch.com.au
www.goldenkitestore.com

This list of websites I monitor and visit regularly, simply because I like the work represented.  However, I honestly can't buy anything further until my current projects have been stitched.  It'll be very hard to resist.

www.artecyshop.com
www.premiumcrafts.com.au
www.sewandso.co.uk
www.mysticstitch.com
www.heavenandearthdesigns.com
www.pinn-stitch.com

Share your stories with me, tell me what you think.  Would love to hear your trials and tribulations in the world of craft or art, whether it be needlework, quilting, knitting, jewellery making, artwork etc.

We are only limited by our imagination
Resist procrastination and start that next project
The end result guarantees personal satisfaction and accomplishment

On that note, I hang up my keyboard for now and return to do battle with my tapestry.